How to display stored inputs
Introduction
Would you like to view and switch between saved design options? Then display entities in a table with the entity table by following these steps.
Prerequisites
- You configured the frames and routes for your solution.
- You configured the relevant contents such as the control panel(s), model(s), viewer(s) and data store.
- You configured the entity data store. See the Store inputs guide for more information.
1. Add an entity table
On its own EntityDataStore isn’t visible in the solution user interface. To view the entities in a table, you can configure an EntityTable.
- Add an entity table block with
kind: EntityTable. - Define the
columnsin the table.- To show values from the entities, define the columns with
kind: Text. - To add a button that deletes the selected entity, define columns with
kind: DeleteButton. - To add a button that selects the entity, define columns with
kind: Button.
- To show values from the entities, define the columns with
💡 The keys defined under columns should match the keys of the entity properties set in the EntityDataStore configuration.
The configuration should look similar to the example below:
  my-table:
    kind: EntityTable
    columns:
      my-value-1:
        kind: Text
        label: My label 1
      my-value-2:
        kind: Text
        label: My label 2
      my-value-3:
        kind: Label
        label: My label 3
      my-select-button: # Optional
        kind: Button
        label: Select
        routerLink: /main-frame
        icon:
          kind: MaterialIcon
          name: chevron_left
      my-delete-button: # Optional
        kind: DeleteButton
        label: ""
        prompt: Delete option
2. Subscribe entity table to entity datastore
To display the stored entities in the table:
- Subscribe the
EntityTableto theEntityDataStore. - Define the
frameandsource.
The configuration should look similar to the example below:
my-table:
    kind: EntityTable
    columns: ...
    subscribe:
      - kind: EntityDataStore
        frame: main-frame
        source: my-entity-datastore
3. Subscribe entity data store to entity table
To select and delete entities from the entity data store when a button is clicked on the entity table:
- Subscribe the
EntityDataStoreto theEntityTable. - Define the
frameandsource. - Define which button(s) in the entity table select a entity with the
selectOnproperty.
The configuration should look similar to the example below:
  my-entity-datastore:
    kind: EntityDataStore
    persistToStore: my-store-name # Optional
    properties: ...
    subscribe:
      - kind: ControlPanel
        frame: main-frame
        source: my-control-panel
        action: Insert
      - kind: EntityTable
          frame: main-frame
          source: my-table
          selectOn:
            - select
            - delete
4. Subscribe control panel to entity data store
To populate the control panel with the values from the selected entity:
- Subscribe the
ControlPanelto theEntityDataStore. - Define the
frameandsource.
The configuration should look similar to the example below:
  my-control-panel:
    kind: ControlPanel
    controls: ...
    subscribe:
      - kind: EntityDataStore
        frame: main-frame
        source: my-entity-datastore
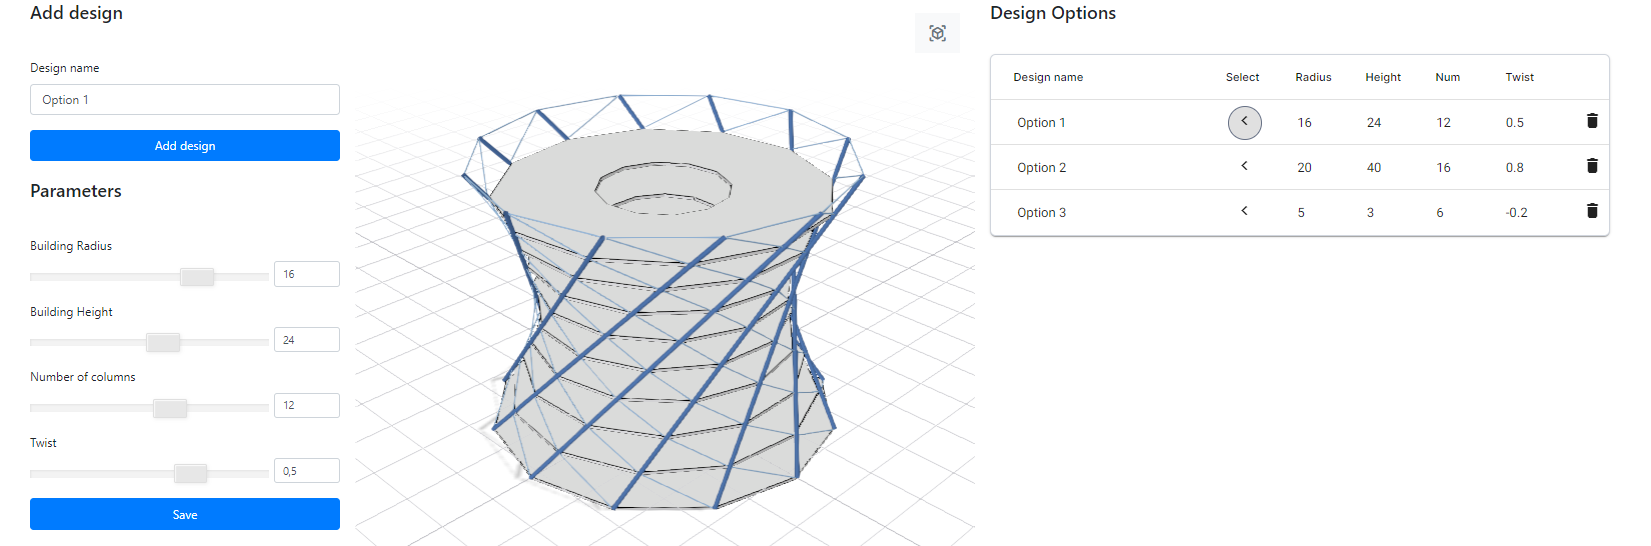
See the image below as an example.
💡 The EntityDataStore and EntityTable can be used in combination with different frames, control panels and data store, to achieve more complex user interfaces such as project overview pages.
Next steps
Filter and search data in the table by following the filter and search stored inputs guide.
Configuration
See the entity table configuration docs for more information.